Dutch Bucket Hydroponics Explained and How to Build Your Own
- Home
- Hydroponic Systems
- Dutch Bucket
Whether you're a beginner to hydroponics or a seasoned hydroponic grower, you've probably come across the term "Dutch bucket hydroponics" (also called Bato buckets). A Dutch bucket is a hydroponic system that uses buckets as the core of the system, and a lot of hydroponic growers use this method. The name sounds a bit confusing, but don't let that keep you away from exploring this type of hydroponic system. Despite their confusing name, Dutch bucket hydroponic systems are manageable and relatively easy to use even for beginner growers. If you've ever wondered what exactly Dutch bucket hydroponics is and how it works, you've come to the right place. In this guide I'll cover everything you need to know about the Dutch bucket method, and then walk you through building one yourself.
What is a Dutch Bucket System?
What is Dutch Bucket Hydroponics and How Does it Work?
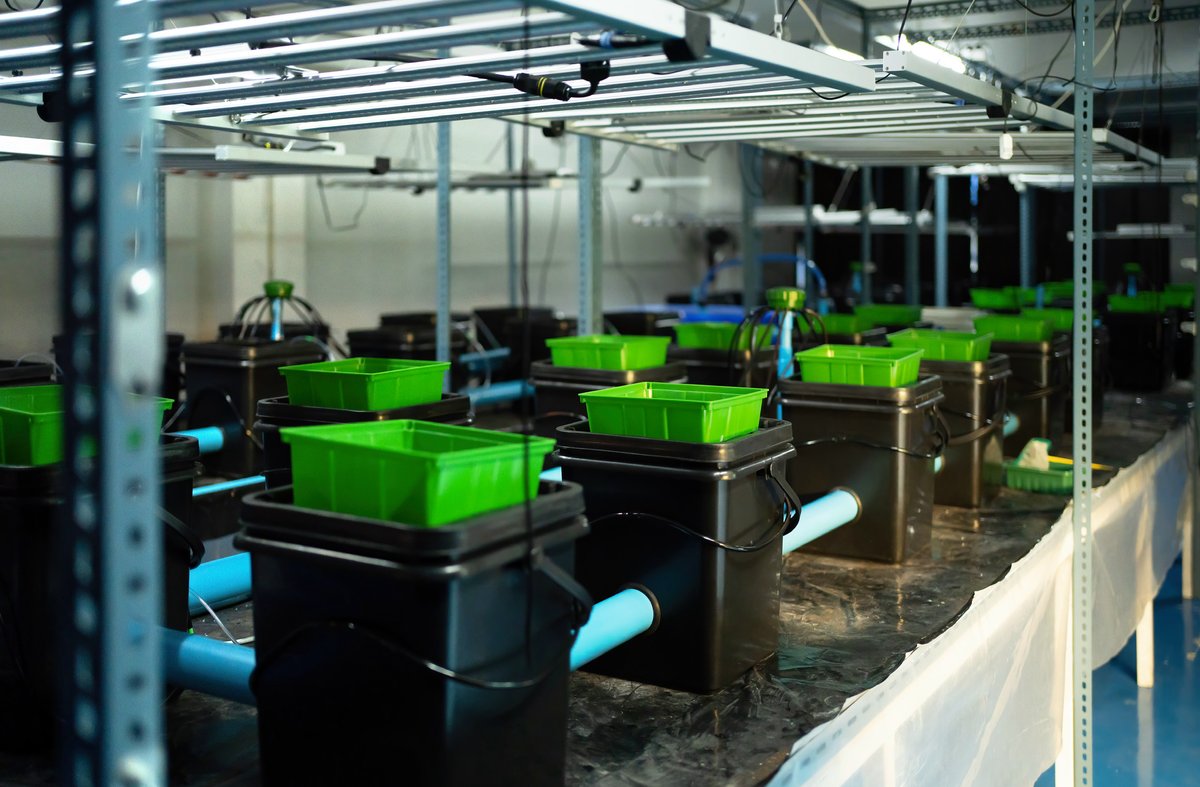
In short, Dutch bucket is a type of hydroponic system where one or more buckets are connected to the same irrigation and drainage lines. One of the main advantages of these systems is that they can be scaled to any size you need, which makes them really versatile. In case you're wondering why they are called Dutch buckets, there is no definite answer to that question; however, some say they were invented in the Netherlands in 1989 for cultivating roses in perlite, hence the name.
Getting a bit deeper into the technical side, Dutch buckets are a form of drip hydroponic systems. The main parts of a Dutch bucket system are buckets, a reservoir, a pump, an irrigation line, drip emitters, and a drain pipe. Just like in a drip system, a pump in the reservoir sends the nutrient solution up to an irrigation line. As the nutrient solution flows down the line, it drips out of drip emitters above each bucket, which have growing medium and plants in them. A Dutch bucket hydroponic system can have just one bucket or hundreds of them. The buckets in a Dutch bucket system are connected horizontally, which means there's plenty of room for upward growth. Usually, there is also an elbow at the bottom of each bucket, known as a bucket elbow. These are used to drain the excess nutrient solution to the return line or drain pipe, which then goes back to the reservoir. Just like drip systems, Dutch bucket systems can be recirculating or non-recirculating. Having a recirculating system allows you to save more nutrients, but it may lead to nutrient imbalance because of recirculated nutrients. If you choose to have a non-recirculating system, this means the nutrients will be drained away and essentially wasted, but you won't have a problem with the nutrient solution unbalancing because of recirculated nutrients.
Dutch Bucket Hydroponics Pros and Cons
Pros
- Flexible setup: You can have as many buckets as you want, which makes this type of system incredibly flexible and versatile. You can also have as much space between the buckets as needed, which makes it possible to grow larger crops in this system.
- Easy to use: Since Dutch bucket systems are a type of drip systems, they are relatively easy to set up and maintain. In addition, due to its simple design, you can build a Dutch bucket system using household materials.
- Space saving: Because the buckets are set up horizontally and are aligned, Dutch bucket systems are relatively compact and are quite good at saving space when compared to other hydroponic systems.
- Can grow tall and large plants: Since the buckets are aligned horizontally and you can have as much space between them as needed, you can grow large and tall plants in this system. You can even grow trees if you want (although you'll need a huge bucket).
- Separated buckets: The buckets are separate from one another, which makes pest and disease control as well as general maintenance much easier.
Cons
- Setting up flow rate can be tricky: As with any drip system, getting the flow rate right can be difficult and is mostly a trial-and-error process. However, once you've got that dialled in, maintaining a Dutch bucket system is rather easy.
- Lots of parts: Dutch bucket systems are not the most complicated, but they still have a lot of individual parts compared to some other systems, such as deep water culture (DWC) or wick systems, which makes building and setting them up a little more complicated.
- Shared reservoir: Because all of the buckets are connected to one reservoir, the whole system will be affected if the nutrient solution quality is off or disease sets in.
Best Plants to Grow in Dutch Bucket Systems
You can grow most plants and even some trees (mostly dwarf varieties) in Dutch buckets, but this system works especially well for tall, large, vining, fruiting, and bushy plants. This is due to the fact that buckets are roomy, which allows plants' roots to spread out, and spaced out from one another, which gives your plants plenty of room to grow. Here is the list of plants that are best suited for Dutch bucket hydroponics:
Tomatoes
Dutch buckets are perfect for growing tomatoes. Tomatoes can grow rather large and become top-heavy, so you'll need to provide some sort of support.
Cucumbers
There are vining and bushy varieties of cucumbers, both of which grow really well in Dutch buckets. Again, you'll need to provide support for them for vining varieties; however, some bushy varieties can also benefit from having support.
Peppers
While peppers can be grown in other systems, they thrive in Dutch buckets, as they love the extra vertical and horizontal space.
Aubergines (Eggplants)
Aubergines have deep roots, so they will thrive in Dutch buckets due to the space for root growth.
Squash
Squash has large roots, which makes Dutch buckets perfect for them.
Pole Beans
Pole beans thrive in Dutch buckets due to the extra space. They can grow quite tall, so they'll need support.
Potatoes
Growing root crops is difficult in most hydroponic systems, but not in Dutch buckets. Since Dutch buckets are filled with a growing medium, potatoes (and other root crops) can grow in it because it mimics their natural growing conditions.
Best Growing Mediums for Dutch Buckets
As with all hydroponic systems, some growing mediums will work better than others in Dutch buckets. In general, grow mediums that are porous, light and absorbent work well in Dutch buckets. It's also a good idea to add a filler to the bottom of the buckets, such as river rock, to prevent smaller media from getting into the reservoir.
Hydroton
Hydroton, also known as LECA (lightweight expanded clay aggregate) or simply expanded clay pebbles, is perfect for Dutch buckets because it's quite lightweight but still heavy enough to provide support.
Coco Coir
Coco coir works great for Dutch buckets. Not only does it hold moisture well and allow for good aeration, but it's also all natural and organic.
Perlite
Perlite is lightweight and porous, and it has great absorption ability, so it works pretty well in Dutch bucket systems.
Vermiculite
Vermiculite is smaller than perlite but will still work in Dutch bucket systems. Just remember to add some river rock at the bottom of the bucket to prevent it from getting into the reservoir.
River Rock
River rock shouldn't be used just by itself, as it isn't porous. However, you can add it to the bottom of your buckets to use as a filler. This will help with drainage and prevent smaller media from getting into the reservoir.
How to Build a DIY Dutch Bucket Hydroponic System
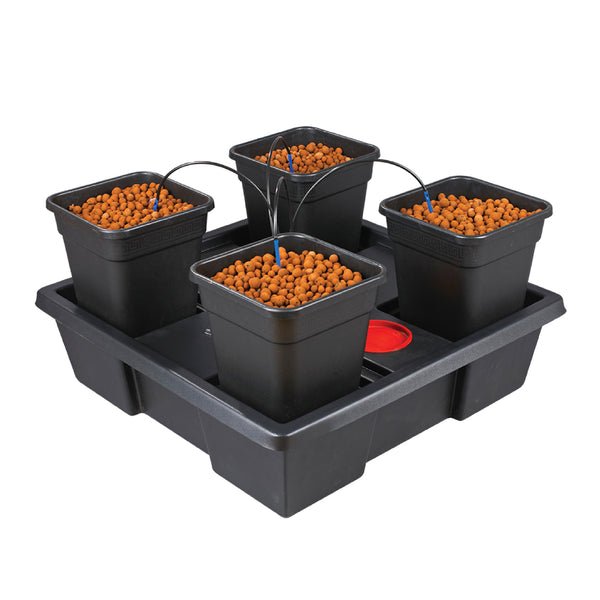
Below you will find instructions on how to build a Dutch bucket hydroponic system with 8 buckets. This is just an example, and you can adjust the instructions to make a smaller or a larger system. Here are the parts and tools you will need to build your own Dutch bucket hydroponic system:
Parts and Supplies
- Large reservoir (15-40 gallon)
- 8 buckets (5-gallon)
- 8 paint strainer bags (5-gallon)
- 8 drip emitters (2 gallons per hour)
- ½-inch poly tubing (20 feet)
- ¼-inch poly tubing (1 roll)
- 2-inch PVC pipe (10 feet) with elbow and end cap
- 1-inch PVC pipe (5 feet)
- 16 PVC elbows (1-inch)
- 8 rubber grommets (¾-inch)
- ½-inch drain valve
- 2 hose clamps
- Zip ties
- Water pump
Tools
- Power drill, 1-3/4" or 1-7/8" and 2-1/4" hole saw drills and 7/8" and 1" spade drill bit. You can borrow a hole saw kit or buy one, you will likely use it again.
- Hacksaw, PVC pipe cutter, or power saw to cut the PVC pipe.
Instructions
Dutch bucket hydroponic systems are typically placed on a table or a bench. You don't need a table or bench, but it does make maintenance and cleaning easier. You can place Dutch buckets on the ground and plane it at an angle. If you do this, you will need to place the reservoir on the ground.
If you use a table or bench, remember to add a slight tilt to the table so that it drains to the reservoir at one end. No matter how you support your hydroponic Dutch bucket system, the important thing is to give the return line a tilt.
- Cut your PVC pipe to about 8 feet and lay it down in your designated area. This will be your drainage pipe.
- Position your buckets, 4 on each side of the PVC drainage pipe. Decide on the spacing of the buckets based on what you're growing. A foot or so apart should work for most plants. Mark the position of your buckets on the drain pipe.
- Use a drill with a 1-inch hole saw to cut holes into the top of the drainpipe on each mark you made.
- Now you can attach the 2-inch PVC elbow to the end of your drain pipe facing down. Position your reservoir on one end of the system, directly under that elbow. If you live in a very hot area, you should consider partially burying your reservoir. This will help the nutrient solution stay cool.
- Using a 1-inch drill bit, drill a hole into the side of each bucket about 3 inches up from the bottom. Attach a rubber grommet to each hole.
- Cut eight 6-inch pieces from your 1-inch PVC pipe. Sand down the ends of these 6-inch pieces so that your 1-inch elbows can connect to them.
- Slide one of these pieces into each hole in your bucket. Then attach a 1-inch PVC elbow to each side of each pipe, elbows pointing down.
- Place your Dutch buckets into place, so that the elbows on the outside of each bucket connect into the holes you cut into your 2-inch drain pipe. Your drainage system is now complete.
- Insert a paint strainer bag into each of your buckets and fill it with the growing medium of your choice. Perlite, vermiculite, hydroton, or coconut coir work best in a Dutch bucket system. The strainer bags prevent the growing medium from draining into your reservoir, which could damage your pump.
- Run your ½-inch poly tubing from the reservoir across the tops of your buckets. This will be your irrigation line. Position it right above the drainage pipe, down the middle of your line of buckets.
- Drill a small hole into the top lip of each bucket right in line with the tube. Run a zip tie through each hole and use it to fasten the ½-inch tube in place.
- Now that your irrigation line is in place, drill 8 holes into it with a ⅛-inch drill bit, one hole for each bucket. Insert your drip emitters into the hole.
- Cut eight 5-inch sections from your ¼-inch poly tubing. Attach one section to each of your drip emitters. These little hoses will make sure the water from your irrigation line drips right into the middle of your Dutch buckets.
- Cut the end of your ½-inch irrigation line on the side opposite your reservoir. Attach the ½-inch drain valve to the end of this line using a hose clamp. This valve can be used to flush out your system when it's time to clean and reset.
- Attach the start of your irrigation line to your pump with another hose clamp and put your pump into the reservoir.
- Add water to the reservoir. Turn on the pump and check the system for leaks.
And this is it, your Dutch bucket system is now finished and ready to go! Now you can add your nutrient solution to the reservoir, put a seedling in each bucket, and let your system get to work for you, growing delicious, fresh produce.
One email a month from me, Charlie. What is new on the site, one grower’s question answered properly, and the latest video. No spam, no selling.


I’m Charlie, co-founder of Everything Hydroponics. I’ve completed an official qualification in hydroponic cultivation, I run the Everything Hydroponics YouTube channel, and I’ve advised and taught many new and existing growers. I’m a teacher at heart, so what you read here is backed up by peer reviewed research and presented in a digestible way. Most of my growing time now goes on chillies. More about Charlie
You might like these
Deep Water Culture: Build A DWC System From A Storage Box
Deep water culture suspends roots in aerated nutrient solution. It needs very few parts, and this is how to build one and why it suits a first system.
Ebb And Flow Hydroponics: How Flood And Drain Systems Work
Ebb and flow floods the roots then drains them, because not every plant likes sitting in water. How the system works, and how to build one.
Wick System Hydroponics: The Simplest System To Build
A wick system draws solution up into the medium with no pump and nothing to fail. What it suits, what it cannot keep up with, and how to build one.