
Ebb and Flow Hydroponic Systems
- Home
- Hydroponic Systems
- Ebb & Flow
Ebb and flow hydroponic systems (sometimes referred to as flood and drain systems) are a fantastic way to grow plants using a moving water source, which is not constantly flowing, as seen in nutrient film technique hydroponic systems.
The basic principle of ebb and flow hydroponic systems is that of a tidal movement of water around the plants' roots and then back into the reservoir, offering both a feeding and rest period for the plants.

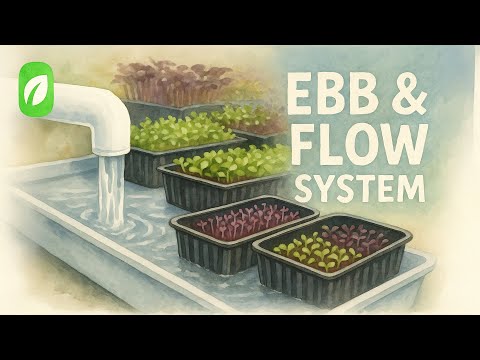
Above, you can see an example of an ebb and flow hydroponic system where each plant is suspended in a growing medium like rockwool or hydroton. Their roots will then make contact with the hydroponic nutrients in the tray below as the tray is filled with a nutrient solution, either automatically or manually. After a period of time, the nutrient solution is then drained away into a reservoir, ideally to be used again for the next flooding cycle, depending on the setup.
But why use an ebb and flow system? Why not just have the plants' roots be in constant contact with the nutrient solution? 🤔
Well, every plant has its preferences, and not all plants like being constantly soaked in water, primarily root vegetables. So while ebb and flow is great for most crops, you can allow for greater periods of aeration, which is a benefit for root crops like beets and carrots.
Should I use an Ebb and Flow Hydroponic System?
Ebb and flow hydroponic systems are great systems, but if you are a beginner, I would advise starting with a deep water culture hydroponic system before jumping into using an ebb and flow system. I say this because of the slight complexities that come with constructing an ebb and flow system, such as pumps and timers, won't bother you in deep water culture.
If you do decide to try using an ebb and flow hydroponic system there are a few things to consider:
It can be quite tricky growing larger plants using ebb and flow because their roots require a lot of space. So you need to consider the size of your grow bed in relation to your crop. And if you are growing root vegetables, make sure your grow bed is deep enough to accommodate them
To keep an ebb and flow system running effectively, the pump must function reliably. It controls the movement of the nutrient solution, and if it doesn’t operate properly, the grow bed may fail to drain, leaving plants sitting in stagnant water and increasing the risk of root rot. Maintaining cleanliness is equally important; a dirty system quickly attracts mould and pests, which can spread through the entire setup.
You should also think carefully about the medium in which your plants are rooted. Since the bed is periodically flooded, lightweight options like perlite or vermiculite are unsuitable, as they tend to float and can cause plants to tilt or come loose. Heavier materials, such as rockwool or coco coir, are far better suited to ebb and flow systems, as they remain stable during flooding and support plant growth more securely.
An ebb and flow system must be precisely balanced and correctly timed. If the cycles are not set properly, the plants may receive too much water and become waterlogged, or too little and risk drying out. Regularly checking the pH of your nutrient solution is also essential, as imbalances can affect nutrient uptake and overall plant health.
These systems operate on repeated irrigation cycles, alternating between periods of flooding and periods when the roots remain exposed to air. During daylight hours, whether from natural light or grow lights, the system should typically flood for 10–15 minutes for every two hours of light. Although five minutes is the minimum possible irrigation time, most setups require longer to ensure adequate nutrient delivery. Once it becomes dark, the plants will no longer need water for photosynthesis, so irrigation can stop, giving the system and the plants a rest. Night-time watering is only necessary in unusually hot and dry conditions.
Running an ebb and flow hydroponic system also means becoming familiar with its routine and mechanical components. If any part fails, especially the pump, the entire process can be disrupted. The roots must never be allowed to dry out completely, so the reliability of the pump is critical. You will also need to understand the specific needs of the crops you are growing, including their preferred humidity, nutrient concentration, and water requirements.
Maintenance is another ongoing responsibility. The pump should be cleaned regularly, as plant debris such as roots and leaves can become trapped inside it. Pipes can also clog periodically and may need flushing. Additionally, pumps generate noise, so you should think carefully about where the system will be located; an inconvenient placement could become irritating or even interfere with your sleep.
Video for Understanding Ebb and Flow Hydroponic Systems
How to Build an Ebb and Flow Hydroponic System
Supplies
-
Four 8-inch (20 cm) pots
-
18-gallon (68.4 L) black Rubbermaid tote with lid (main reservoir)
-
30-quart (28.4 L) clear Rubbermaid Snaptopper tote (grow tray) that fits on top of the reservoir
-
Timer capable of 15-minute intervals
-
Aquarium air pump with 6 feet (1.8 m) of tubing
-
T-connector and 5-inch (12.5 cm) air stone
-
½-inch (1.2 cm) black irrigation tubing, approximately 18 inches (45 cm) long
-
Suitable growing medium such as rockwool, coconut coir, or hydroton
-
Submersible pond pump rated at 120 gallons per hour (455 L/h)
-
Fill-and-drain fitting kit with an extension
-
Nutrient solution
-
pH meter
- pH control kit for adjusting the solution
Tools
-
Power drill
-
1¼-inch (3.2 cm) hole saw
-
3/8-inch (9.5 mm) drill bit or spade bit
-
Zip ties
Assembly Instructions
-
Prepare the grow tray
Drill two 1¼-inch (3.2 cm) holes in the centre of the clear Snaptopper lid. Smooth any rough edges with sandpaper and arrange your four pots around these openings.
-
Mark and cut the reservoir lid
Place the clear tray on top of the reservoir lid, align the holes, and mark their positions. Remove the tray and drill matching holes in the reservoir lid.
-
Create additional access points
Drill two more 1¼-inch (3.2 cm) holes on opposite sides of the reservoir lid—one for the pump’s power cord and one to check nutrient levels without removing the lid.
-
Install the drain fittings
Fit the drain hardware into the holes of the clear tray. Hand-tighten the rubber gasket underneath—do not use tools. Attach the extension to the overflow tube (the thicker ¾-inch / 1.9 cm tube).
-
Attach the pump tubing
Slide the ½-inch (1.2 cm) tubing onto the pond pump outlet. Use a zip tie if necessary to ensure a secure fit.
-
Assemble the system
Place the clear tray with fittings back onto the reservoir lid so the fittings sit through the corresponding holes. Trim the irrigation tubing if required so that it lies flat at the bottom of the reservoir, then connect it to the shorter drain tube. Secure it with a zip tie if needed.
-
Install aeration components
Place the air stone into the reservoir, feeding the airline and pump cord through the side holes. Position the lid assembly on the tote and snap it into place.
Tip: The air pump should always sit higher than the reservoir to prevent backflow.
-
Mark water levels (optional but helpful)
Use a wooden dowel as a dipstick. Mark it every time you add 2 gallons (7.6 L) of water. This makes it easy to track nutrient strength without lifting the lid.
-
Fill and adjust the reservoir
Pour 10 gallons (38 L) of water into the reservoir and add nutrients. Test the pH—aim for 5.5–6.5—and adjust using the control kit if needed.
-
Start aeration
Turn on the air pump to ensure the air stone continuously oxygenates the solution.
-
Prepare and place the plants
Drill small drainage holes along the sides of each pot if desired. Fill the pots with your chosen growing medium, place your plants inside, and firm the medium around the roots. Water them from above initially until they adapt to the ebb and flow cycle.
-
Fine-tune drainage
If water remains in the tray after draining, raise the pots by ½ inch (1.2 cm) to prevent standing water and potential root rot.
-
Set the watering schedule
Program the timer so the system floods three times daily for 15 minutes each—commonly at 6 a.m., 12 p.m., and 6 p.m.
-
Run aeration continuously
Keep the air stone bubbling 24 hours a day to maintain oxygen levels in the nutrient solution and prevent stagnation.